Surface Preparation
It’s very important for any residue from pre-existing floor be fully removed by scraping, heat gun, solvent, etc. Any surface that is completely smooth, like fiberglass/gelcoat, must be rough sanded and de-waxed before applying cork adhesive. Cork will contour to any uneven areas in your floor, so the time to remedy these is now. If you are applying SeaCork over non-skid, it needs to be structurally sound, and not too tall/aggressive. Order additional adhesive to account for filling in the gaps.
Templating
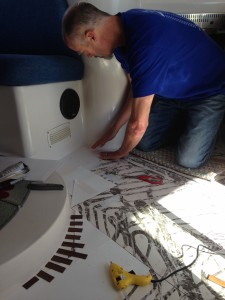 You can save yourself a ton of hassle, and end up with a more professional finished product, if you take the time to build proper templates for your floor sections. This is not necessary if you are working with planks and grooved sheets, AND plan to have a generous border around all pieces. Otherwise, building proper templates is the only way to assure an excellent result. Simply measuring and creating a schematic is a recipe for disaster. You can use any flexible but resilient substrate that is easy to cut: Poster board, plastic sheet, composite pressboard sheets, etc.
If you have rounded areas, or enclosed areas (hard against a wall), it will be best to get some wood strips and a glue gun, in order to allow for precise contours of these areas. You can often find thin wood strips as off-cuts from your local carpentery shop, or buy a small sheet of door skin (sometimes called Luan single ply) at a home improvement store. Cut these down to one inch (or less, for more detail) width strips.
Cut your poster board to the rough size and shape of your area, then use the glue gun and wood strips to nudge right up against the wall or contours of your project area. The result is an accurate template that will provide confidence and an excellent final result.
Rounded Vertical Corners
If your working surface joins the vertical wall in a curved corner instead of 90 degrees (common on fiberglass boats), consider how this will affect the cork as it reaches the wall. You basically have three options.
- Let the cork end short of the curved area and fill the gap with caulk
- Sand the underside of the cork edge to match the rising curve of the floor near the wall
- Install the cork as normal, and sand the edges flat (this will require sanding RIGHT up to the wall, so make sure you protect it)
Stealth Seams
At some point – especially on larger projects, or when trying to minimize wasted material – you will require a seam in your project. Follow these steps for a seam that almost disappears completely when finished:
- Make sure pieces are a perfect match with a straight line cut (avoid curves or angles).
- Run masking tape along the edge of each piece.
- When laying into place on the cork adhesive, dip the edge of each piece, or otherwise minimally coat the edges.
- While pressing cork into place, firmly press the pieces together so a small amount of adhesive escapes through the seam between the pieces of tape.
- Before the adhesive has begun to cure, wipe this bead of adhesive flat.
- Remove the masking tape after 20 minutes or so, as the adhesive has begun to stabilize.
- The remaining line of adhesive will be barely noticeable, and can be further trimmed with a razor blade and a steady hand. Assuming you are sanding, this line will become all but invisible.
- DO NOT do additional hand sanding along the seam. This will work against your desired outcome. Trust us.
Avoiding Trapped Air
It is important to avoid trapping air under the cork when laying pieces onto the adhesive. This can prove difficult, especially with larger sheets of material. Consider holding up the two edges, and allowing the center of the cork section to contact first. Without pressing too hard, slowly bend/roll the remaining cork into place, first one direction from the middle, then the other. Once fully in place, you can press quite firmly to finish distributing adhesive, and allowing small bubbles to escape.
More details and photos in this Guide: Installing Cork Deck in Catamaran Cockpit (english PDF) »