Si le démarrage sur votre projet de revêtement de sol en liège semble ardue au premier abord, ne vous inquiétez pas. Il est seulement le manque de familiarité avec le matériau qui vous fait hésiter. Dans la réalité, projets de liège se révéler plus facile, plus rapide et plus simple à exécuter, aussi longtemps que vous prenez le temps de planifier à l'avance et de recueillir les bons outils et matériaux. Voici quelques choses à considérer lorsque vous esquissez sur votre projet.
Cork Epaisseur
Comment décider si 4mm, 6mm, 8mm ou 12 mm est bon pour votre projet? Ceci est largement une question de préférence personnelle, Bien feuilles de liège épais certainement vous donnera une plus grande longévité, surtout si vous prévoyez de sable / réparer souvent (plus rarement faire). Liège épais va donner un peu plus de coussin aux pieds. Liège Diluant suivra les contours de plus près, et vous faire économiser de l'argent. 6mm ou 8 mm sont les choix les plus courants pour presque chaque type de projet. Notez que l'épaisseur de 12mm nécessite plus de matériel calfeutrer pour remplir la rainure profonde. Vous devez planifier sur trois cartouches par mètre carré, au lieu de deux. (50% plus). Seacork France maintient également le niveau des stocks inférieurs de l'épaisseur de 12mm, entraînant parfois des retards de livraison 1-3 semaines.
Rainurée vs feuilles plates
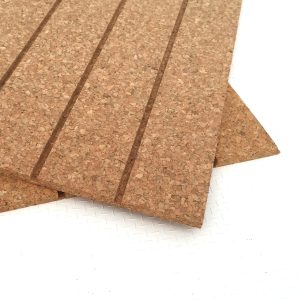
 Ceci est largement une question de style, un look nautique traditionnelle contre quelque chose de plus moderne et clairsemée. Certains préfèrent le naturel, aspect propre du liège par lui-même. Beaucoup insistent que les lignes de calfeutrer dans un plancher ou une terrasse ajouter à la perception de la longueur et de l'espace. D'autres trouvent que les lignes de calfeutrage aider les zones sales déguisement. Mais on ne peut nier que les feuilles et les planches rainurées, avec le mastic d'accompagnement, permettra de créer plus de travail sur l'installation. Et le coût de matériel supplémentaire.
Cork Draps vs planches
Si votre projet a un grand nombre de temps, subtiles courbes le long de la même direction que les rainures (généralement avant et arrière sur un bateau), vous pouvez préférer planches étroites (47mm*, 73mm, 103mm ou 125 mm), qui vous permettra de suivre ces courbes avec le produit. Pour presque tous les autres projets, feuilles de liège se révélera plus efficace pour l'installation. Même dans ces cas,, toutefois, vous devriez probablement choisir un petit nombre de planches supplémentaires pour couvrir les extrémités ou des coins où la coupe dans la nouvelle feuille se révéleraient inutiles courts. Il ya eu un peu de gros, yachts traditionnels qui ont coupé (coutume) planches plus larges à partir de feuilles non rainurés. Bien sûr, les projets de maisons typiques sont parfaitement simples, avec beaucoup de grande, rectangles faciles.
*47mm est le plus populaire, correspondant à l'aspect classique de teck, et correspond également aux dimensions des feuilles de Seacork rainurés.
REMARQUE: Toutes les largeurs de planches indiquées sont des largeurs totales pour la surface couverte, mais tous comprennent une feuillure d'un côté pour le remplissage des rainures de calfeutrage (par exemple. 47une planche de mm donnera un liège visible de 43 mm plus une rainure de calfeutrage d'environ 4 mm)
Border vs Aucun
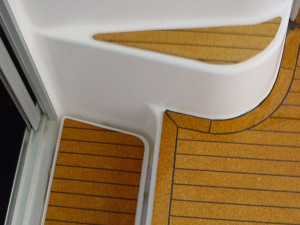
De nouveau, un choix stylistique. Traditionnellement frontières de teck ont été inclus sur les ponts pour couvrir le grain des planches de fin, pour protéger de l'intrusion de l'eau en excès et de l'expansion. Avec liège, il n'y a pas de telles préoccupations. Encore, nombreux sont ceux qui préfèrent ce regard traditionnel nautique, et les frontières réduisent le nombre de calfatage noir extrémités ouvertes sur vos morceaux. Il se révèle aussi être un processus d'installation plus simple, que les sections principales et les planches peuvent être posés en place sans nécessiter volées parfaites. L'excès est coupé près de la frontière et vous vous retrouvez avec un produit fini sans précision vaste templates. Soyez prudent pièces frontalières de planification sur les sections qui sont plutôt petites. Si la principale zone rainurée est pas au moins 4 ou 5 fois la taille de la frontière, ces sections peuvent sembler un peu bizarre.
Mesure
Tous les produits de liège sont vendus en unités métriques, donc il est certainement plus facile à mesurer de cette façon si vous le pouvez. Si non, nous avons une calculatrice simple pour votre usage. Évitez la tentation de simplement ajouter tous vos dimensions ensemble pour un total, que cela se traduira par un calcul inexact, suivie par une déclaration inexacte (et grossièrement exagéré) estimation. Convertir chaque mesure en centimètres, puis calculer les centimètres carrés de chaque section. Ajouter tous ces chiffres jusqu'à obtenir votre superficie totale. Déplacer la décimale quatre lieux, et vous êtes arrivé à votre superficie totale en mètres carrés. Ajouter 5-15% supplémentaire pour réduire les déchets. (Notre Projet Area Calculator rend tout cela très facile.) Maintenant vous êtes prêt à aller faire du shopping.
Excédent / déchets
Chaque projet aura une certaine quantité de déchets, qui est pourquoi il est important d'ajouter 5-20% à votre commande. Courbes agressives, des formes triangulaires ou trapézoïdaux seront tous entraîner un gaspillage considérable. Vous avez deux options:
Option 1) Mesurez chaque section de votre projet comme si elles étaient des rectangles complets. Vos mesures seront fonction de la durée la plus longue et la plus grande largeur de chaque zone. Cette méthode se traduira par une plus grande superficie calculée, mais pratiquement aucun risque de venir à court.
Option 2) Mesurez chaque section aussi précisément que possible, et d'ajouter un chiffre pour surtitrage. Sachez que vous serez imbriquer des formes bizarres ensemble la mesure du possible, et que certaines pièces peuvent se retrouver avec de multiples coutures. Les bonnes règles de base pour la détermination des excédents pour votre commande:
- Rectangles parfaits, ou seulement légèrement arrondi rectangles: 5% excédent
- Partiellement rectangles propres avec quelques sections avec extrémités recourbées: 10% excédent
- Environ rectangles de moitié-moitié ou le rétrécissement des formes trapézoïdales: 15% excédent
- Circles, beaucoup de courbes dramatiques, coins impairs: 20% excédent


